
 It's February and winter is winding down. Well, unless you live in Montana where winter seems to go on forever. So, for those cold, rainy (or snowy) days that lay ahead, here is a soup recipe to warm your soul.
For this recipe, I used a rotisserie chicken purchased from the deli at my local grocery store. I like using rotisserie chickens for many recipes from enchiladas to soups. Even though I love roasting my own chicken and having a great meal, I like these deli chickens for quick weeknight meals. Of course, you can use raw chicken in this recipe. Just add the chicken (diced) at the beginning of the cooking process when you are sautéing the onions and garlic. You can also use any type of leftover cooked chicken you have available. Make this recipe your own. I'm offering you the building blocks... Cream of Chicken and Rice Soup
In a small sauce pan, combine 2 cups stock and rice. Bring to a boil; cover and reduce heat to simmer. Cook for 20 minutes. While the rice is simmering, combine the olive oil and butter in a stock pot placed over medium heat. Add the onions, garlic, carrots, and red pepper flakes. Sauté for 5-8 minutes or until the vegetables are soft. Season lightly with salt and pepper. Lower the heat to medium low and add the flour and stir to make a roux. Cook for 1 minute. Stir in the remaining 2 cups of stock. Bring to a boil over medium heat; reduce heat to low. Add the cooked chicken and the rice (including the liquid). Simmer for 15-20 minutes. Stir in the milk. Add the kale/chard and parsley. Adjust seasonings to taste. Serve with warm, crusty bread.
0 Comments
 If you are looking for a recipe that is easy to put together, gluten free, and extremely delicious, then look no further. This is a classic recipe for a flourless cake. The best part -- you don't need to have a bunch of gluten free flours sitting around. All you need are eggs and chocolate. Seriously simple ingredients.
I paired this with a raspberry chocolate sauce. It isn't necessary but it sure is delicious. The sauce would work great with ice cream, too. Flourless Chocolate Cake with Raspberry Chocolate Sauce Makes 1 9-inch cake Cake:
Sauce:
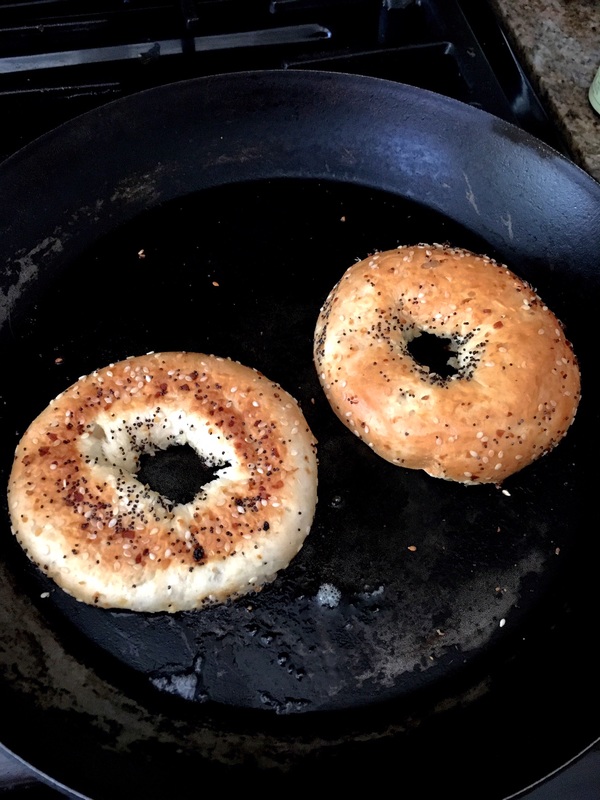
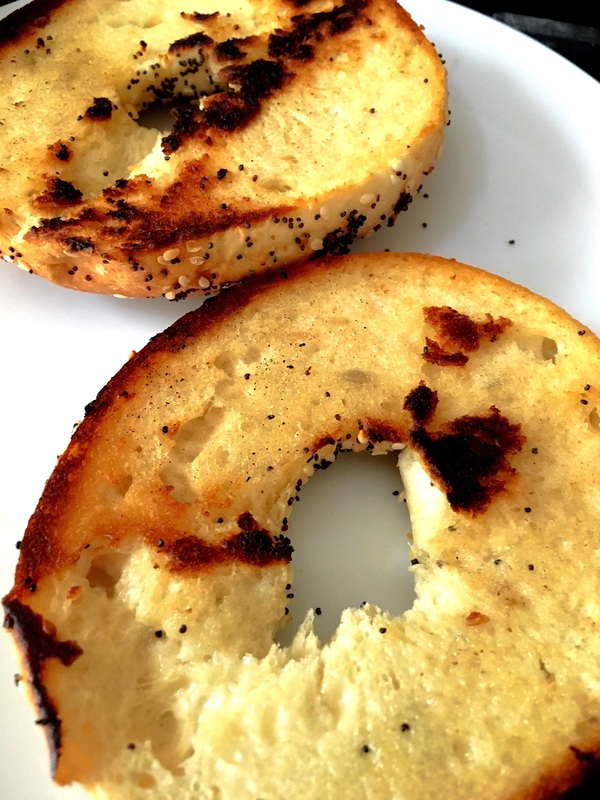
Preheat the oven to 275ºF. Grease the bottom and sides a 9-inch cake pan. Line the bottom with parchment paper. Butter the paper. Set aside. Melt the butter and chocolate together in a microwave or in a pan on the stove set on low heat. Stir until melted. Cool the mixture until it's lukewarm, about 5 minutes. Pour into a large mixing bowl. Whisk in the egg yolks, vanilla, and Kahlua. Set aside while you whip the egg whites. In a mixing bowl, whip the egg whites on high speed until soft peaks form. Gradually add the sugar. Whip the whites until stiff peaks form. Add one cup of the egg whites to the chocolate mixture. Stir to mix well. With a large spatula, gently fold in the rest of the egg whites into the chocolate mixture, making sure to completely incorporate the whites into the chocolate. To fold properly, do not stir the mixture. Move the spatula in the same direction, gently flipping the batter and whites over each other until it's homogenized. Pour batter into the prepared cake pan. Bake for 45-50 minutes or until the cake feels firm in the center and begins to pull away from the sides of the pan. Cool completely. Dust with powdered sugar. Sauce: Heat the cream, raspberries and sugar over a medium heat until the berries have broken down and become mushy. Add the chocolate chips; stir until melted. Remove from heat and pour mixture through a fine mesh strainer. Refrigerate sauce until ready to serve. If sauce is too thick, stir in a little water to thin it out slightly. Toasted Bagels: You're doing it wrong.
Yeah, you heard me. Get that bagel out of the toaster. You want a toasted bagel? Use a skillet instead. I've been eating toasted bagels ever since I can remember. When I was a kid, my mom would make me toasted bagels and her method is perhaps the absolute best way to enjoy them. Sure, I've used a toaster or toaster ovens for my bagels, but using a skillet has an advantage over these popular methods. Instead of drying out the bagel, as toasters often do, the skillet method keeps the bagel soft while offering a lovely toasty surface upon which to spread the cream cheese. No more dried out bagel. You get one that is toasted and soft. It's a simple method: Cut the bagel in half like you normally would. Spread a thin layer of butter on the cut side. Place bagel, butter side down in a non-stick skillet. Cook over medium heat until toasted and golden brown. Remove from pan. Spread with cream cheese or preferred bagel topping. Enjoy a toasted bagel that is soft and warm. The way bagels should be. 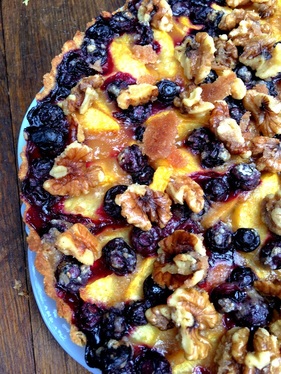 I've been baking a lot lately. I didn't intend for this to happen, but with all the delicious fresh fruit hanging out at the farmers market, tarts, pies, and cakes have been entering my mind lately. I see fresh, ripe peaches and before you know it, I'm making a tart.
I love pie, but tart is a perfect way to show off fresh fruit like peaches. Pies can be heavy and sugar-laden. Tarts are lighter and typically contain less sugar, making them a perfect end to any summer meal. This tart in particular utilizes both fresh blueberries and peaches. You can purchase store-bought crust, or make your own. I offer a simple recipe below. The star of the show is the fruit, so pick ripe peaches (ones that are sweet and juicy) and big, plump blueberries. Peach and Blueberry Tart with Candied Walnuts Makes 11-inch tart Tart Crust:
Tart:
Candied Walnuts:
Preheat oven to 425ºF. Make the Tart Crust: In a mixing bowl, stir together both flours, salt, and sugar. Stir in the olive oil and milk. Mix until just combined. Transfer dough to an 11-inch tart pan with removable bottom. Press the dough into the pan covering the bottom and sides of the pan. Fill in any holes with excess dough. Make the Tart: Combine the peaches, blueberries, sugar, flour, orange zest, and salt in a large mixing bowl. Pour the mixture into the crust. You can try to decoratively arrange the peaches and blueberries around the crust or just leave it more free-form. Dot the tart with the butter. Bake for 35-45 minutes or until golden brown and bubbly. Sprinkle with candied walnuts. Cool completely. Serve with whipped cream or vanilla ice cream. Make the Candied Walnuts: Melt the butter in a skillet set over medium heat. Add the walnuts, sugar, and cinnamon. Stir and cook for 5 minutes or until the sugar is melted and the walnuts are coated in the mixture. Spread the walnuts onto a baking sheet. Cool completely before breaking apart. 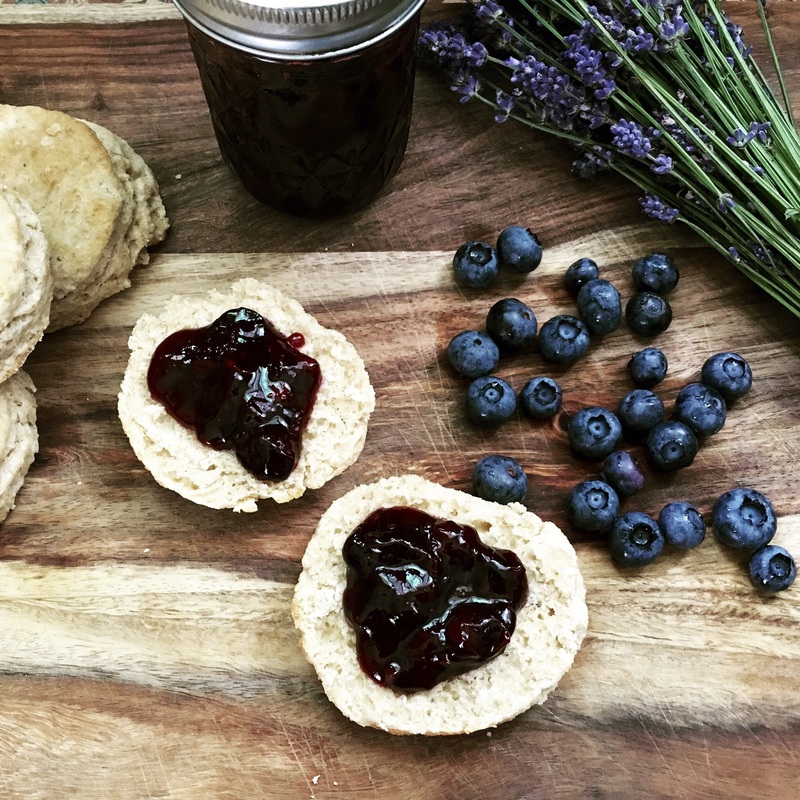 Blueberries are making their debut at my local farmers market and I just could not resist picking up a flat of these scrumptious little berries. While I could have made a blueberry buckle or cobbler, I decided to make jam. But not just any jam. Blueberry Lavender Jam because incidentally, fresh lavender also popped up at the farmer's market recently, and it made perfect sense to add a little something extra to my jam. If you have never worked with fresh or dried lavender, you need to know a couple of things. First, you need to find "culinary grade" lavender. There are a few varieties of lavender but you want the one that will taste the best with food. It's a safe bet that if you find dried lavender in the spice section of the store, then it's culinary grade. If you find fresh lavender, ask the grower or store if it is for culinary purposes. Second, a little bit of lavender goes a long way. It's a very floral herb and will dominate the flavors of a recipe if you use too much. So, for this recipe, I used 1 teaspoon of fresh lavender and it was enough to give it that light floral flavor but not be overpowering. If using dried lavender, reduce it to 1/2 teaspoon for this recipe. A quick note about canning: I did not can the jam in the normal way (boiling the filled jars, etc). I chose to make a freezer or refrigerator jam. I filled plastic containers (found in the canning section) and will freeze most of my jam so we can enjoy it through winter. If you want to can the jam, please follow instructions on the box of pectin you are using or go to the Ball website for more information. Lastly, this recipe is considered a low-sugar jam recipe, so you need to use the appropriate pectin for it. You can find pectin in most supermarkets and low sugar pectin is typically available everywhere. 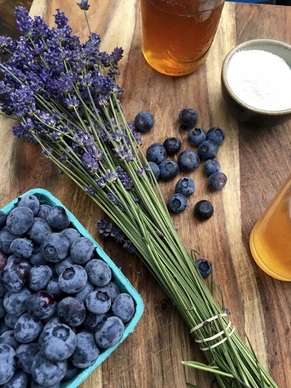 Blueberry Lavender Jam
Makes about 6 cups
Before you get started on the jam, wash and sanitize the plastic canning containers, funnel, and ladle you will be using to fill the jars. Set aside until ready to use. Place the blueberries, juice concentrate, pectin, and lavender in a 4 quart saucepan. Stir to combine and place over medium heat. Bring to a boil, stirring constantly, until thickened and the boiling mixture cannot be stirred down, about 5-10 minutes. Depending on the power of your stove, you may need to lower the temperature to medium-low to prevent burning. Once the mixture has thickened, stir in the honey. Bring to a boil for 1 minute. Remove from the heat. Fill the plastic "jars" to the designated fill line or about 1/4 inch from the top. Securely fasten the lids to the top of the containers. Cool to room temperature and let it sit on the counter for 24 hours to set up. Refrigerate the jam for up to 3 weeks or freeze for up to 6 months. 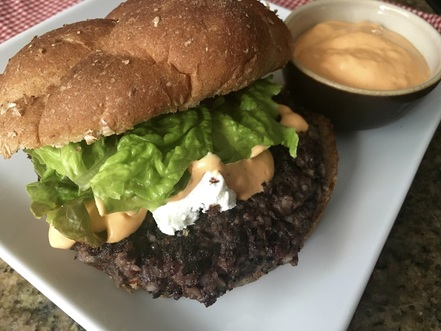 While I love a good beef burger, sometimes I want to be a bit healthier, so I go with black bean burgers. Plus, my kids would rather have black bean burgers, as odd as that may sound. In fact, they request these more often than not.
The recipe calls for cooked forbidden rice, which is a black rice that can be found in most supermarkets with a bulk food or organic section. If I know I'm making these burgers during the week, I make sure to serve the rice with another meal and make a little extra to save for the burgers. However, you do not need to use forbidden rice in the recipe. There are many different types of rice that can be substituted. My only suggestion is to choose a whole grain rice (brown rice, etc). In a pinch, cooked quinoa could be substituted as well. And... as with all my recipes, this one can be tailored to meet your family's tastes. My family loves spicy food, which explains why I always use chili peppers whenever possible. If your family prefers mild flavors, you can omit the chipotle peppers and add whichever seasonings you want. Black Bean Burgers Makes 4 burgers
Place the onions, garlic, and chipotle peppers in a food processor. Pulse a couple of times to finely chop the pieces. Add the black beans, rice, salt, pepper, and cumin. Pulse several times to puree the mixture. How smooth you want the mixture is up to you. I prefer the burger to have a little texture, so I only pulse a few times to make it semi-smooth. Scrape the mixture into a bowl and stir in the bread crumbs. Heat the olive oil in a non stick skillet over medium heat. Form the bean mixture into patties. Cook on each side for 2-4 minutes or until lightly browned. Add cheese if desired. Serve on toasted buns with typical burger fixings. 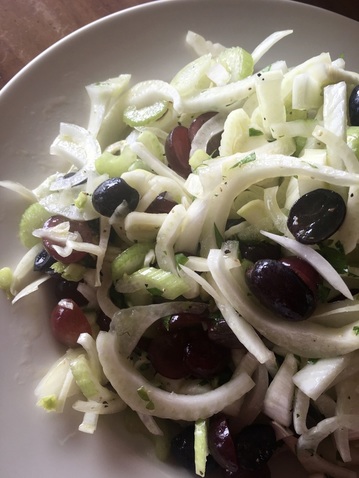 If you are looking for a good salad that is easy to make and great for a cookout, then look no further. Made with fresh, crisp fennel, this salad has a slight anise flavor (from the fennel) playing against the sweetness of the grapes. The salad can be served with any grilled meat or seafood. It's a lovely alternative to the standard garden salad.
You can find fennel at the supermarket but I encourage you to look for it at your local farmer's market. That way, you are sure to get the crispiest, freshest fennel. Fennel and Grape Salad Serves 4-6
In a large bowl, toss together the fennel, grapes, celery, onion, and parsley. In a small bowl, whisk together the lemon juice, garlic, mustard, salt, and pepper. Drizzle in the olive oil while whisking. Pour vinaigrette over the salad and toss together to mix well. The salad can be made up to 1 day ahead of time. Keep refrigerated until read to serve. 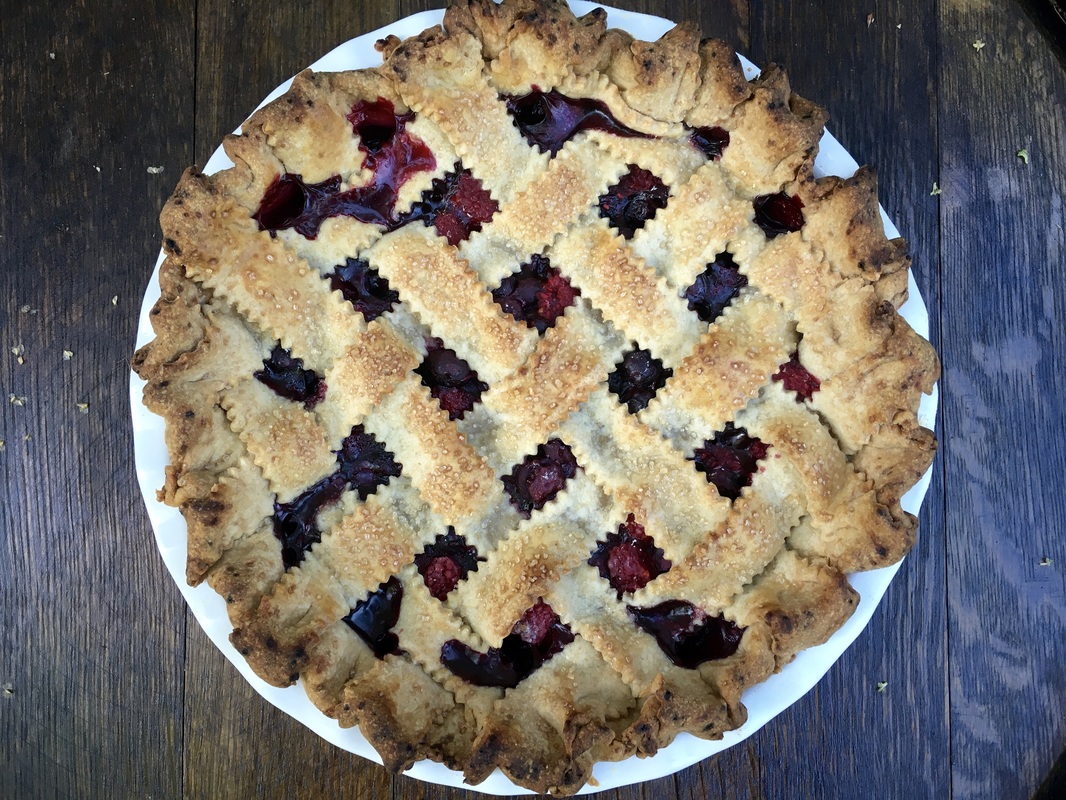 The berries are here! The berries are here! The berries are here! This is what I want to scream each time I visit my local farmer's market. I might get strange looks but I don't care. I love fresh local berries. For the past few weeks we've had the pleasure of eating fresh cherries (my favorite), but now raspberries and blueberries (and other berries) are making their debut. Every time I see lots of fresh berries, I feel the need to bake a pie or tart. With the plethora of fresh berries right now, I will have to find many uses for them since I cannot eat pie every day. Well, I could eat pie every day but I don't think I should do so. Until I find the time to make jam (lavender blueberry jam is in the works), I decided to bake a pie. I love 3 pies -- Apple pie, Cherry pie, and Mixed berry pie. What I love about this recipe, is that you can use whatever berries you have available. I used blueberries and raspberries for this recipe but you can use blackberries and black raspberries as well. It's up to you. And ... you need to make a crust. Or you can purchase a ready made pie crust. Even though I won't tell on you (people are busy, I know), I will say that a homemade pie crust is much better than store bought. The recipe for the crust is below. Mixed Berry Pie Yield: 1 10-inch pie
Preheat the oven to 400ºF. On a lightly floured surface, roll one pie crust out into a 12-inch circle. Carefully transfer crust to the pie plate. Gently tuck it in to the plate. Place the berries in a large mixing bowl. In a small bowl, whisk together the sugar, cornstarch, and salt. Add the mixture to the berries. Toss to coat well. Add the orange zest and juice. Toss mixture to combine well. Pour mixture into the pie crust. Roll out the other pie crust on a lightly floured surface. You can either cut strips to make a lattice design or simply transfer the crust to the pie. If choosing the latter, be sure to cut for slits in the top of the crust (for vent holes). Trim the edges of the crust to make about a 1-inch overhang. Fold the crust under to create a seal with the bottom crust. Brush the top with the heavy cream and sprinkle with sugar. Bake for 25 minutes at 400ºF. Reduce heat to 350ºF and bake for another 25-30 minutes or until the filling starts bubbling through and the crust is golden brown. Allow the pie to cool on a wire rack for 1 hour. Refrigerate for about 2 hours before serving. The pie is good warm or cold and best served with vanilla ice cream. Double Pie Crust
Place the white whole wheat flour, all purpose flour, sugar, and salt in the bowl of a food processor. Pulse for 10 seconds to combine ingredients. Add the butter; pulse several times until the mixture resembles coarse meal. With the processor motor running, slowly pour in the cold water. Pulse until the mixture starts to come together and form a ball of dough. Divide the dough half. Flatten each piece slightly. Cover with plastic wrap. Refrigerate for at least 1 hour, preferably up to 2-3 hours. Dough can be made 1-2 days ahead of time.  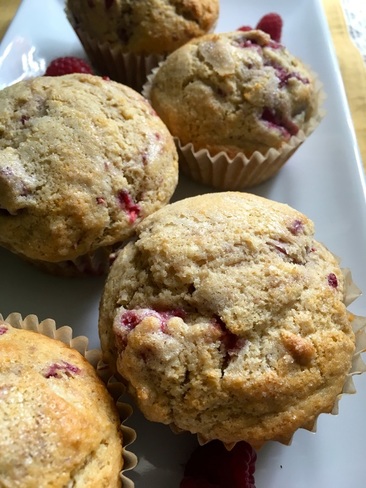 Going to the local farmer's market is always an adventure for me. So far, growers at my local market have many offerings from basic vegetables (lettuces, onions, radishes) to fruits like strawberries, cherries, and raspberries. I've already had my fill of cherries and strawberries. With the strawberries, we made gelato (recipe coming) and with the cherries, we made a tart (recipe forthcoming) and froze the rest.
But with the raspberries, my daughter wanted to make muffins and I wanted to make scones, so we did both. Why not? Both are equally good and were equally devoured within a day. The scone recipe will be posted separately. Choose the sweetest, freshest raspberries you can find. I encourage you to find a grower (u-pick farm) or peruse the farmer's market. The raspberries at the store are ok (organic is best), but they are not as sweet and flavorful as the ones you will find locally. In fact, the same goes for any fruit. Local fruit is far superior to the fruit sold in the grocery store, even organic versions. Raspberry Lemon Muffins Makes 12 muffins
Preheat oven to 400ºF. Line muffin pan with paper cupcake liners. Set aside. In a medium mixing bowl, combine the white whole wheat flour, 1/4 cup white flour, sugar, baking powder, and salt. In a small bowl, toss the raspberries in the remaining 1/4 cup white flour; set aside. In a small bowl, whisk together the butter, milk, egg, and lemon zest. Stir the wet ingredients into the dry ingredients. Mix until just combined (do not over mix or make a smooth batter). Carefully fold in the berries. Fill the muffin cups 3/4 full with batter. Sprinkle the top of each muffin with sugar. Bake for 17-20 minutes or until a toothpick inserted in the center of a muffin comes out clean. Cool completely before serving. Store in airtight container. 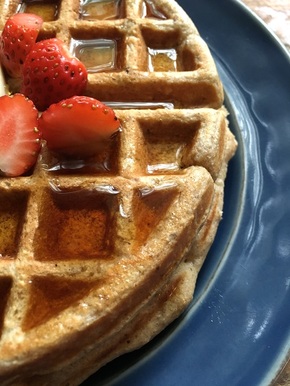 What's for brinner? Waffles, of course.
You might be wondering, what is brinner? Well, brinner is breakfast for dinner. You know, like how brunch is breakfast and lunch. We first heard of "brinner" several years ago on a little show called "Scrubs." Since then, my husband and I have made it a point to have "brinner" on a regular basis. But you just can't have any simple brinner like cold cereal or danishes. No, it has be to substantial - a full meal. While we love pancakes, sometimes you really want a waffle instead. Waffles are crispier versions of pancakes and this recipe makes them even heartier. Serve with fresh berries, maple syrup (the real stuff), and bacon (of course) and you have a delicious meal. Breakfast for dinner. Brinner. These waffles are full of whole grains and are incredibly filling. One waffle is quite enough for each person. Oat and Almond Waffles Makes 4 standard size waffles
Preheat the waffle iron according to manufacturer instructions. In a food processor, pulse together the oats and almonds until coarsely ground (not powder fine, but a little more coarse than that). Place oat mixture in a mixing bowl. Add the flour, sugar, baking powder, salt, and cinnamon. Stir to combine. In a small bowl, whisk together the milk, eggs, and butter. Add the wet ingredients to the dry ingredients and mix until combined. Pour about a 1/3 cup (depending on the size of your waffle iron) in the center of the preheated iron and press the lid down. Cook waffles according the iron's manufacturer's instructions. Serve with fresh berries, maple syrup, and anything else you desire. We love bacon or sausage with our waffles. |
New Book!Shining Star 
 Archives
October 2022
Recipe Categories
All
|

 RSS Feed
Home |
About |
Resources |
About Marcy |
Contact |
Copyright © 2015