
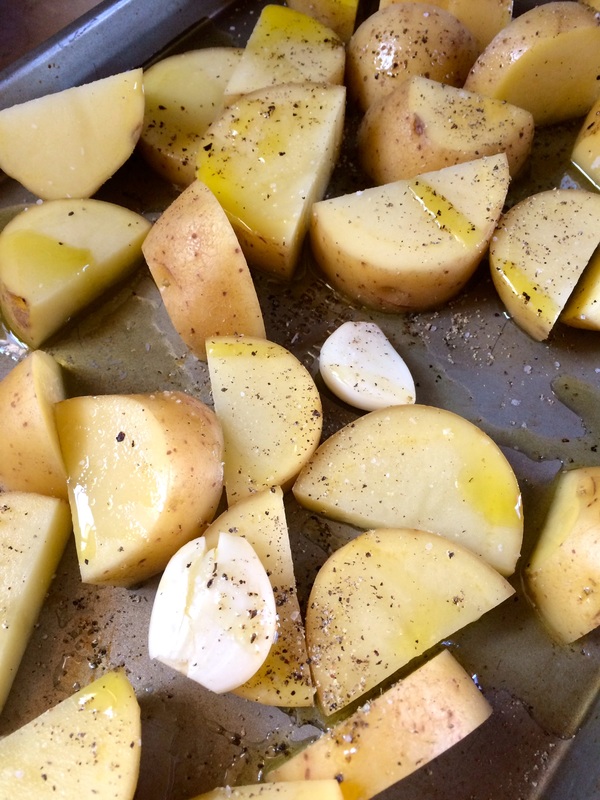
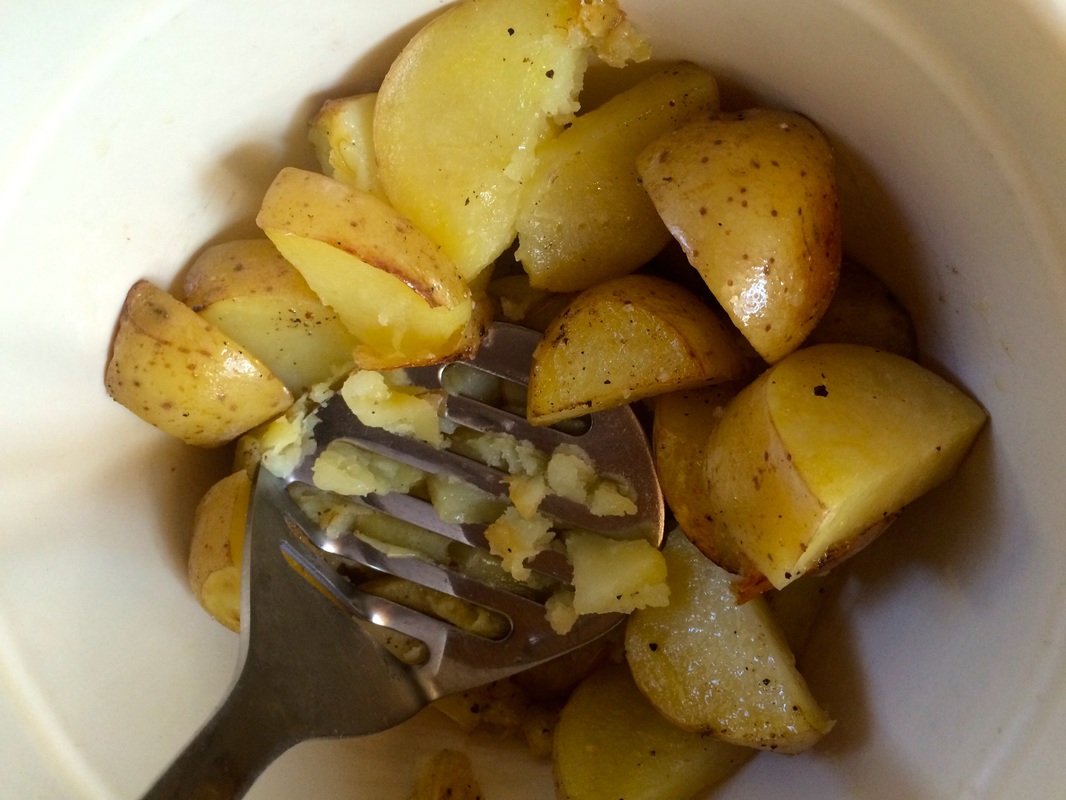
 Mashed potatoes tend to be a favorite side dish this time of year with the holidays lurking around the corner. When it comes to mashed potatoes, there are two camps of people. In the first camp are those who want mashed potatoes that are light and fluffy and sans lumps. But then there those in the second camp who really don't care about lumps in the potatoes. We just want to make mashed potatoes as painless as possible. I tend to be in this camp. Look, I cook a lot. I can make perfect mashed potatoes if I really want to. But I don't. I have other things to worry about. My mashed potatoes will taste great but will contain lumps and skins. As a dietitian, I feel it is important to note that the skins contain most of the vitamins, minerals, and a touch of fiber. So eat the skins. They're good for you. Here you have Roasted Smashed Potatoes. No peeling. No boiling. All you do is roast the potatoes until fork tender, then mash them up (skins and all) with butter, milk, and sour cream. I sound like an infomercial. Sorry. Roasted Smashed Potatoes Serves 4
Preheat the oven to 350ºF. Toss the potatoes and garlic in the olive oil. Season lightly with salt and pepper. Spread mixture onto a sheet pan. Roast in the oven for 30-40 minutes or until the potatoes are fork tender. Place the cooked potatoes in a bowl. Let them sit for 5 minutes or so to allow some of the steam to come off. Add the butter and sour cream. With a potato masher, mash the butter and sour cream into the potatoes and garlic. Stir in the milk until desired consistency. Season to taste with salt and pepper. Serve.
0 Comments
 One of my all-time favorite meals is roast chicken. In fact, if I had to pick my last supper, it would be roast chicken with ratatouille. Seriously good, comforting eats. Before I really started cooking, I was intimidated by a few basic recipes -- biscuits, pie crust, and roast chicken. Seems odd, right? Well, my mom may have been a good cook when I was a kid, but I don't ever remember her roasting a chicken or making pie or biscuits from scratch. Don't get me wrong, she could throw together a mean casserole and maybe pot roast but she was always in a hurry to get dinner made. So, when it was time for me to start learning how to cook some basic recipes, I turned to Julia Child (basic French), Marcella Hazan (basic Italian), and the Betty Crocker cookbook (basic everything). Seriously. Honestly, if I had to keep one cookbook, it would probably be Hazan's Essentials of Italian Cooking. It's a classic and one that every budding chef should have. Hazan has a recipe for lemon roast chicken that is one of the easiest recipes around. Over the years, I've used the same basic recipe but put my own spin on it. In the recipe, the chicken will cook in 1 hour. One piece of cookware that is essential for this is a cast iron pan. If you don't have a cast iron pan, go out and buy one. They are not expensive and will last a lifetime. Best non-stick pan out there. You can get away with using another oven safe pan but cast iron will retain the heat much better. Roast chicken is best served after it has rested for about 20 minutes after cooking. Serve with a side of vegetables -- your preference. You can make gravy from the pan juices, if you so please, but I am not providing instructions on that. Honestly, this chicken doesn't need gravy. Roast Chicken Serves 6
Preheat oven to 490ºF. Place your oven-proof pan in the hot oven for 20 minutes. While the pan is heating up in the oven, get your chicken prepped. In a small bowl, combine the olive oil, garlic, lemon zest, rosemary, salt, and pepper. Pat the chicken dry with paper towels. Tuck the wings under the breast. Using your fingers, make a pocket between the skin and breast. Spread the half of the olive oil mixture under the skin of the chicken so that it touches the meat directly. Spread the other half the olive oil mixture on the skin of the bird. Stuff the rosemary stems and the lemon wedges in the cavity of the bird. Tie the legs together with the butcher string; cut off excess string. Set aside until the pan is ready. When the pan has been heated, carefully remove the pan from the oven and place the chicken, breast side up in the hot pan. Put it back in the oven and roast for 35 minutes. Turn off the heat (resist the urge to open the oven) and leave the chicken in the oven for an additional 30 minutes. Test for doneness by inserting an instant read thermometer into the thickest part of the breast. When it reads 165ºF in the breast (170º in the thigh), the bird is done. (In case the bird is not cooked through, turn on the oven and roast at 350ºF until the chicken is at the proper temperature, about 10-15 minutes longer.) Remove from the oven and allow to rest for 20 minutes before slicing and serving. 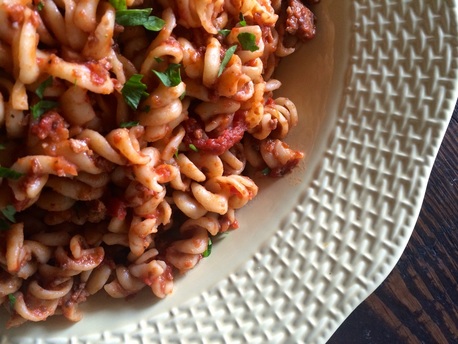 Originating from Bologna in Italy, traditional bolognese is a slow cooked meat sauce made with beef or a combination of beef and pork (and sometimes veal). Since I'm a dietitian, I always look for ways to make recipes healthier and steer away from beef whenever possible. I save beef consumption for special meals (like an all-beef chili or a filet mignon) and will only use grass-fed beef in these preparations. Grass-fed beef tends to be pricier than grain-fed beef, especially if you live in the Midwest, like me, making it a special occasion treat for us. So, when it comes to making a slow-cooked meat sauce to serve over pasta, I had to find ways to make it just as hearty and tasty as the traditional recipe. The secret: Mushrooms. Mushrooms contain a flavor profile called "umami," which is a savory taste, almost meat-like. MSG (monosodium glutamate) contains the "umami" flavor, along with soy sauce, both of which add depth of flavor to dishes. Mushrooms are the ultimate umami flavor enhancer in recipes when you want to forego beef and pork. By adding mushrooms to the recipe, you add that savory, meat-like flavor that beef provides but with way less calories and fat. Chicken thighs are added as a meat component in this recipe. To chop the chicken thighs, you don't need a meat grinder but rather, use your food processor. In fact, use your food processor for all the chopping of the vegetables, too. As with the traditional recipe, this recipe needs to cook for 2-3 hours to develop in flavor. You will also need wine - both for the recipe and for drinking as the sauce cooks (of course!). Choose an Italian wine like a Chianti or Sangiovese (or even a Barolo or Barbaresco if you want to go that route). Chicken and Mushroom Bolognese Serves 4-6
Put the chicken thighs into the bowl of a food processor, pulse several times until the chicken is finely ground. Heat the olive oil in a large pot over medium heat. Add the ground chicken to the oil and begin to brown. Chop the onions and garlic in the food processor until chopped fine, about 15-20 pulses. Add the onions and garlic to the meat. Sauté for 3-5 minutes. Season lightly with salt and pepper. Finely chop the mushrooms in the food processor. Add the mushrooms to the meat mixture. Sauté for another 3-5 minutes. Add the tomato paste; cook for 1-2 minutes. Add the red wine, tomatoes, and bay leaf. Season lightly with salt and pepper. Reduce heat to medium low and cook for about 3 hours. Taste the sauce and season to taste with salt and pepper. About 30 minutes before the sauce is done, cook the pasta in salted boiling water until al dente. Drain and add about a 1/4 cup of the pasta water to the sauce. Add the pasta to the sauce; toss to coat well. Serve the pasta with crusty bread and grated Parmesan cheese. 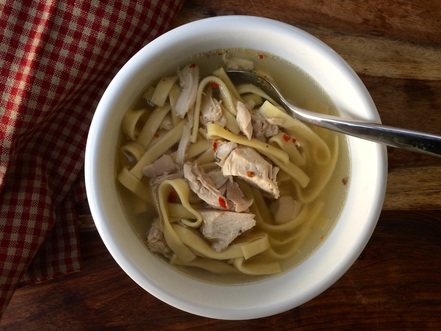 We've officially entered fall when the leaves are changing and a chill fills the air. Fall is my favorite time of year. I actually welcome the weather change from hot and humid to chilly and breezy. One of the best parts of fall is the change in cooking and recipes from light meals to hearty chili, soups and stews. You know, meals that help to create a cozy, comfortable setting at home. Over the years, I've made a lot of chicken noodle soups. I finally decided on a better way to make chicken noodle soup -- using a whole chicken and keeping things very simple. This is a good recipe for a weekend meal. As you are running around doing errands on a Saturday afternoon, your soup can be simmering away on the stove. If you want, you can make this in a crockpot set on low over 3-4 hours. In this recipe, you are making the stock or base of the soup with the whole chicken and then using it right away to make the soup. This provides much better flavor than using storebought stock. Chicken Noodle Soup Serves 8
In a large stock pot, add the chicken, onion, carrots, celery, garlic, parsley, and thyme. Add the water. Place over medium high heat. Bring up a simmer and then reduce the heat to medium low. Periodically srape off any "scum" that floats to the top (see pictures below for what I'm talking about). Simmer for about 2-3 hours or until the chicken is done. Carefully remove the chicken from the stock and place in a bowl. Allow to cool for 20-30 minutes before removing the meat from the bones. Strain the stock; discard the solids and save the liquid. Pour the liquid into a stock pot. After the chicken has cooled and you've removed the meat from the bones, bring the stock up to a simmer over medium high heat. Add the chicken meat and the noodles. Season to taste with salt and pepper; add red pepper flakes for a little heat if desired. Cook for 15-20 minutes or until the noodles are tender and cooked. Serve with bread or crackers. Soup will keep for up to 5 days in the refrigerator. Freeze any leftovers for up to 6 months. Enjoy! 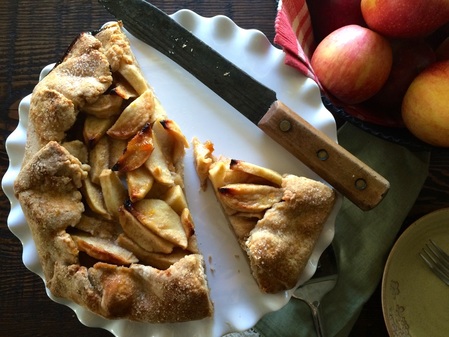 A galette is the French term for rustic pie or freeform pastry. These can be made with any fruit filling. For instance, I once catered a party and made 7 mixed berry galettes. I wanted to serve a lovely dessert but I don't own 7 pie plates and making galettes was relatively simple and easy to assemble. Since it's apple season and there are a plethora of apples being sold at farmers markets or at your local apple orchard, I figured an Apple Galette was in store for us. When making any apple dessert, I always use 2-3 different varieties of apples. Why? For flavor and texture. Some apples are tart, while others are sweet and juicy. I like a combination. My favorite varieties to bake with are Gala, Fuji, Macintosh, Braeburn, and Honey Crisp. There are several other varieties to choose from, however. Jonathan makes the best applesauce, but I rarely ever use it in pie. Red Delicious are only good for eating and even then they have a tendency to taste rather bland. At any rate, go for a mix of apples. Your pie or galette will be even better. Apple Galette Yield: 1 9-10 inch galette Pie Pastry
In the bowl of a food processor, combine the white whole wheat flour, all-purpose flour, sugar, and salt. Add the butter and pulse for 15-30 seconds to create a coarse looking mixture. With the food processor running, add the water until the mixture forms into a ball. Mound the pastry dough into a ball and flatten slightly. Cover with plastic wrap and refrigerate for at least 1 hour before using. Can be made up to 2 days ahead of time. Galette
Preheat oven to 400ºF. Line a baking sheet with parchment paper. Set aside. In a medium sized bowl combine the apples, honey, orange zest, and orange juice. In a small bowl, mix together the 1/2 cup sugar, cinnamon, and cornstarch. Add to the apple mixture and stir to combine. Set aside. On a lightly floured surface, roll pie pastry to a 12-inch diameter circle. Transfer pie crust to a baking sheet. Place the apple mixture in the center of the pie crust, leaving a 2-inch border around the edge of the crust. Dot the filling with the butter. Fold in the sides of the crust, overlapping as you go around the circle. Brush the crust with the cream and sprinkle with sugar. Bake for 25-30 minutes or until crust is golden brown and apples are soft. Serve with ice cream or sweetened whipped cream. 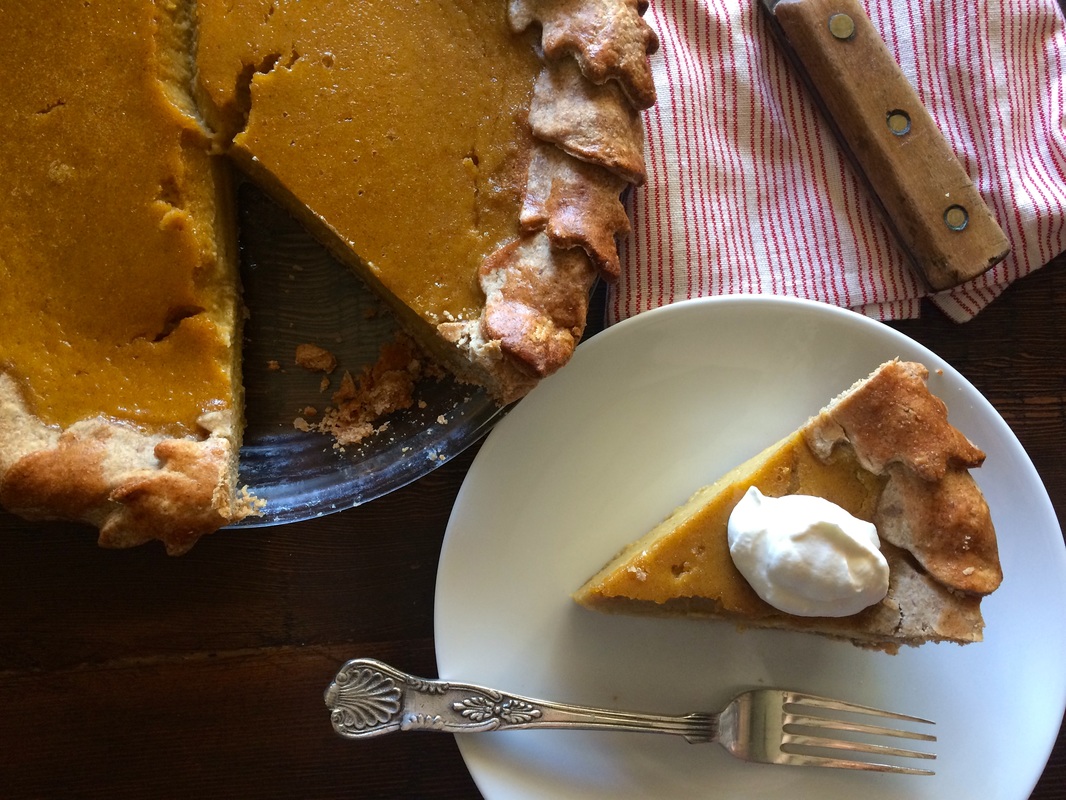 Thanksgiving is right around the corner. It's only 6 1/2 weeks away. I don't want everyone to panic or anything but the holidays are quickly approaching. Now is the time to start thinking about Pumpkin Pie and whatever else you might serve on Turkey Day. You'll have turkey, of course and perhaps a side dish or two or three. If you are lucky, your guests will bring a dish to share. But you might not be hosting dinner and you may want to bring dessert to the gathering. Why don't you wow your family with a homemade pumpkin pie that utilizes local ingredients. I'm sure your family will be mightily impressed by your culinary skills. I have the pleasure of hosting Thanksgiving this year in our tiny little house where our 10-foot dining table barely fits in the dining room. My husband built the dining table when I couldn't find one that I actually liked. Now I have a rather large and heavy table (usually the backdrop of many food photos) that can seat about 12 comfortably. Although, I doubt we will have that many people this year. Our house can only accommodate about 8 people before you start to feel claustrophobic. At any rate, even though I am not the biggest fan of pumpkin (yeah, I've explained this before), a good pumpkin pie is something to cherish. For this recipe, I sourced as much as I could locally -- pie pumpkin, honey, maple syrup, and eggs. You can look for other local ingredients like flour and cream if you so choose. It all starts with the pumpkin. Instead of opening a can of pumpkin puree, I opted to use a fresh pie pumpkin that needed to be roasted first. I suggest doing this 1-2 days before making the pie. That way, any extra water or moisture in the pumpkin will leach out and you can pour it off. Among my vast collection of cookie cutters, I have a few leaf and nut shapes. I decided to spruce up the pie with a decorative border. This is optional and you can just forego the decorative leaves and make a crimped border like you would with any other pie. If you want to use leaves, you need to make extra pie pastry (just double the pie pastry recipe). Pumpkin Pie Yield: 1 9-inch pie The Pumpkin
Preheat the oven to 375ºF. Cut the stem off the pumpkin with a big sharp knife. Cut the pumpkin in half vertically. Scoop out the seeds and pulp around the seeds. Place flesh side down in a large baking dish or on a sheet pan. Cover with foil. Bake for 1-2 hours until the pumpkin is soft. Remove from oven and cool for 30 minutes before handling. The skin or rind of the pumpkin should come off easily as it cools; peel it off the flesh. Place the flesh in a bowl and refrigerate until cold. This can be done 1-2 days ahead of time. When ready to use, scoop out what you need, leaving any extra water that has accumulated in the bottom of the bowl. Using a food processor or hand blender, puree the cooked pumpkin until smooth. My pumpkin was 3 pounds 14 oz and yielded about 3 3/4 cup cooked pumpkin. A 5 pound pie pumpkin might yield about 4 1/2 cups cooked pumpkin. One 15-ounce can of pumpkin is about 1 2/3 cup. Pie Pastry (double the recipe if you want to make leaf shapes)
In a food processor, finely grind the pecan pieces. Add both flours, sugar, and salt. Pulse for 10 seconds to mix. Add the butter; pulse for 15-30 seconds or until the mixture resembles coarse meal. In a liquid measuring cup, stir together the water and honey. With the food processor running, pour in the water mixture. Pulse until dough begins to form. Place the pastry dough on a lightly floured surface and knead it slightly until to comes together in a ball. Flatten into a disk. Wrap in plastic and refrigerate for at least 1 hour. Can be made 1-2 days ahead of time if kept under refrigeration or kept in the freezer for 1-2 months. The Pie
*Local eggs are not always graded by size. Large eggs typically weigh about 2 oz (54.4 g). Preheat oven to 375ºF. Roll the pie pastry into a 12-inch circle. Transfer the pastry dough to the pie plate. Tuck the pastry into the pie plate and cut off the excess dough hanging over the sides leaving about 1 inch overhang. Roll the top of the crust under to create an edge and crimp decoratively (if doing the leaf design, skip the crimping part). Prick the bottom of the crust with a fork. Place piece of foil on the crust, making sure it meets the sides. Fill with dried beans or rice, making sure they meet the sides of the pastry. Bake for 12 minutes. Remove from the oven and remove the foil and beans. The beans can be reused for future pies. Lower the oven temperature to 350ºF. In a mixing bowl, whisk together the pumpkin puree, eggs, cream, sugar, maple syrup, cinnamon, ginger, nutmeg, and salt. Pour the mixture into the pie pastry. Bake for 50-55 minutes or until the middle of the pie is just set (doesn't wiggle). Cool for 30 minutes on a wire rack. Chill for at least 2 hours in the refrigerator. Serve with sweetened whipped cream (not Cool Whip... please oh please, do not serve with Cool Whip). If making the leaf design, roll out the other pie pastry to about 1/8-inch thick. Cut into leaf shapes. In a small bowl, make an egg wash with 1 egg and 1 tablespoon of water. Brush the edge of the pie crust with the egg wash. Decoratively place the leaf and nut shapes all around the edge of the pie. Brush with egg wash. About half way through baking you may need to cover the edge of the pie with foil to prevent it from browning too much. 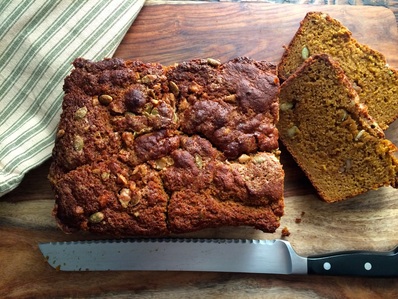
Since it's Fall and pumpkins are now decorating front porches and grocery stores and all baked goods are made with pumpkin flavorings, why not share a pumpkin bread recipe. This can also be made into muffins as with any quick bread. If you choose the muffins route, bake for 20 minutes or so at 400ºF.
I've also admitted recently to not liking pumpkin flavored everything (Gasp!). However, pumpkin bread every once in awhile is fine with me. As in I will only eat this one time during October. I might have pumpkin pie at Thanksgiving but you won't see me heading to Starbucks for a pumpkin latte. I like my coffee sans weird fruity or veggie flavors, but hey, that's just me it seems. But I'm not the only one who has grown tired of all the pumpkin flavored foods available this time of year. The Daily Show did a funny segment about it just last week. A clip is posted at the end of this post for you all to see. Americans are just crazy for pumpkin everything during the fall. It's gotten out of hand if you ask me. I'm more of an apple fan. Apples? Anyone want apples? There are so many to choose from and they're sweet and crispy! Ok. Fine pumpkin it is. Please note, you need a big loaf pan for this. I use a 9x5-inch pan. You can use smaller loaf pans, just divide the batter among them. The baking time will be shortened to about 45 minutes depending on how big the loaves are. Maple Swirl Pumpkin Bread Makes 1 9x5-inch loaf
Maple Swirl:
Preheat oven to 350ºF. Grease and line the bottom with parchment (grease the parchment paper, too) of a 9x5-inch loaf pan. Set aside. In a small bowl, combine the Maple swirl ingredients -- butter, brown sugar, maple syrup, walnuts, and pumpkin seeds. Set aside. In a mixing bowl, whisk together the dry ingredients -- flour, baking powder, baking soda, salt, cinnamon, ginger, and nutmeg. In another bowl, whisk together the sugar, butter, eggs, Greek yogurt, molasses, and canned pumpkin. Add the wet ingredients to the dry and whisk until combined. Spread half of the batter into the prepared pan. Make a trough in the middle of the batter; add half of the maple swirl mixture into the trough. Spread the rest of the batter on top and make a trough in the center of the batter; add the rest of the maple swirl mixture to the batter. Using a knife, swirl the mixture throughout the batter. The maple swirl helps keep the bread moist; I doubt you will actually see the swirl after it's baked. Bake for 60-75 minutes or until a toothpick inserted comes out clean (check it at 50 minutes to see how it is doing). Remove from oven and cool on a wire rack for 15 minutes before moving from the pan. Get More: Comedy Central,Funny Videos,Funny TV Shows 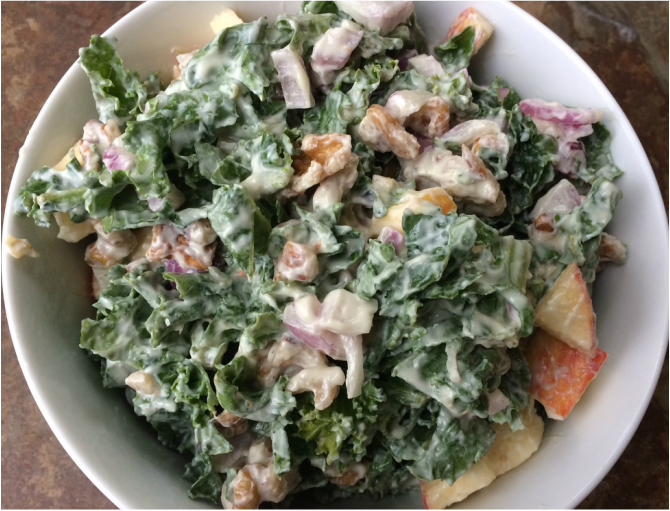 Looking for more ways to incorporate kale into your diet? I'm sure some of you are, but perhaps there's a few of you sitting there asking, "What's the deal with all the kale?" Well, it just so happens that kale is good for you. Shocking, I know. It's one of those dark green vegetables that seems to be poking its head everywhere. Kale chips. Kale soup. Kale smoothies.
Now, Kale Slaw. And why not? Sure, cabbage is good for you but if you want even more vitamins and minerals, opt for kale. And ... I made this slaw even healthier by using yogurt instead of mayo. I created this recipe back in February during my dietetic internship where it was served in the hospital cafeteria along side Smoked Brisket Posole and Cherry Cobbler (don't worry... recipes will follow). The result? People liked it. Really. You see, kale can be good, especially if put it with strong tasting foods like apples and onions. I won't make anything that I will not eat first. Not only did the folks at the hospital like it, it also passed the test with my husband who is not the biggest fan of kale. So... there you have it. Kale Slaw. Try it. You might like it. Kale Apple Slaw Serves 6 Dressing:
Slaw:
In a bowl, whisk together the yogurt, honey, sugar, cider vinegar, mustard, and olive oil. Season to taste with the salt and pepper. Refrigerate until ready to use. In a large bowl, toss together the kale, red onion, apple, and walnuts. Add the dressing and toss to coat the mixture well. Refrigerate for at least 30 minutes before serving. Can be made 1 day ahead (actually it tastes better the next day). Serve cold. |
New Book!Shining Star 
 Archives
October 2022
Recipe Categories
All
|
 RSS Feed
Home |
About |
Resources |
About Marcy |
Contact |
Copyright © 2015