
Peach Pie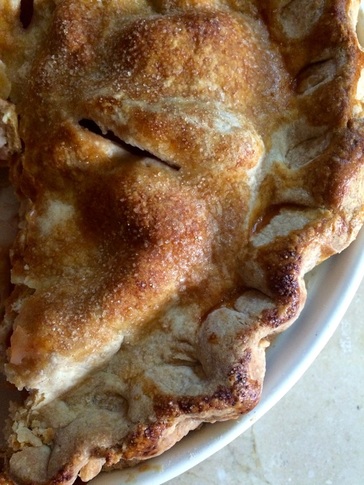 I’ll take pie over cake any day of the week. A good pie has a flaky crust for a foundation and a sweet filling, but not too sweet. Now, my favorite pies are ones that are made simply – utilizing the freshness and ripeness of the fruit. Apple and cherry pies are by far my favorite, but I won’t turn down peach pie made with fresh, ripe peaches. I bought peaches at a local farmer’s market. They were fresh and ripe, ready for pie. Instead of using cinnamon, I decided to use cardamom. It offers a spicy, yet warm flavor to the pie. If you prefer, you can substitute cinnamon or leave it out completely. It’s up to you, but I encourage you to try cardamom. If you have never made a pie crust before, now’s the time to learn! The recipe is a basic all-butter pie pastry. It’s a classic recipe that can be used for any pie or tart. Pie Pastry makes a double pastry
In the bowl of a food processor, combine the flour, salt, and sugar. Add the butter and pulse until the mixture resembles coarse meal. With the motor running, drizzle the water through the feed tube. Add enough water until the mixture starts to clump together. If the mixture seems too dry, add a little water. If you added too much water, add some flour. The mixture should be somewhat dry and hold together. It should not be crumbly or sticky. Divide the dough into 2 discs. Wrap each in plastic and refrigerate for at least 1 hour. Can be made 1-2 days ahead or 1 month ahead if kept in the freezer. and now for the main event: Peach Pie Yield: 1 10-inch pie Serves 8-10
Preheat the oven to 400ºF. Peel the peaches by the same blanching method as the tomatoes. Bring a pot of water up ta simmer (near boiling). Mark an “X” in the bottom of each peach and the place the peaches in the hot, simmering water for 30-60 seconds. Remove each peach and place in ice water. The skins should peel off easily, especially if they’re ripe. Cut the pit of each peach and slice into pieces. In a bowl, combine the sugar and cornstarch. Add the sliced peaches, lemon juice, ginger, cardamom, and salt. Mix well and set aside. On a floured surface, roll out one pie crust to a 12-inch diameter. Tuck the dough into the pie plate. Be careful not to stretch it; tuck it in. Stretching the pastry causes it to shrink. Pour the filling into the pie shell. Dot the filling with the butter. Roll out the second pie crust and and place over the filling. Cut off any excess pie pastry leaving about an inch lip around the pie. Fold the edges under and crimp decoratively around the edge. Mark the top of the pie crust with 4 slits. Brush the crust with the heavy cream and sprinkle with sugar. Place the pie on a baking sheet (in case it boils over). Bake for 10 minutes and then lower the temperature to 375ºF. Bake for 1 hour to 1 hour 15 minutes. Tent the pie if the edges get too brown. Cool to room temperature on a wire rack. Chill for 3-4 hours before serving. Serve a la mode. 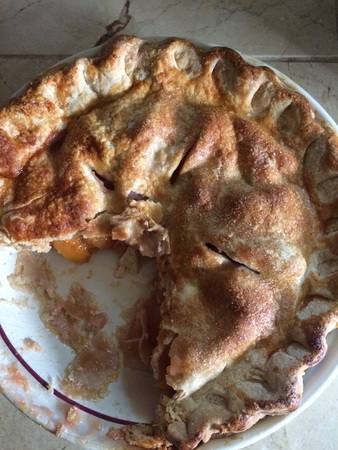 A good pie doesn't last long around the house.
0 Comments
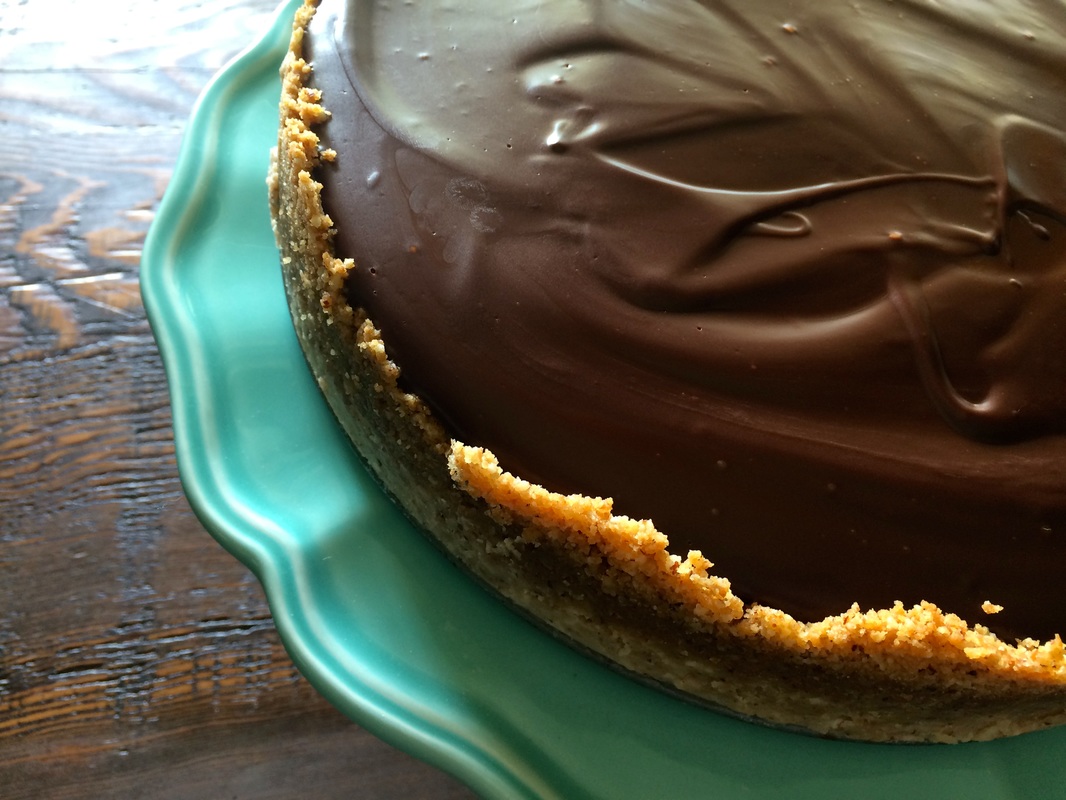
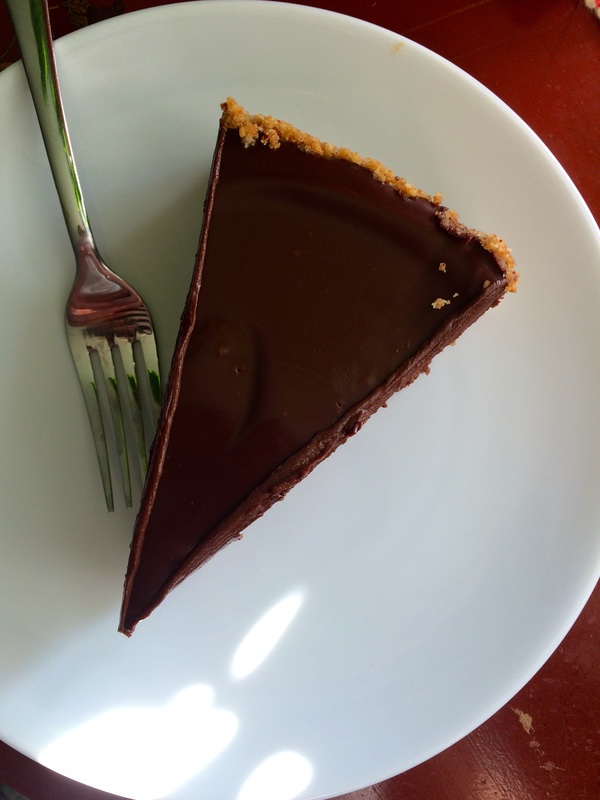
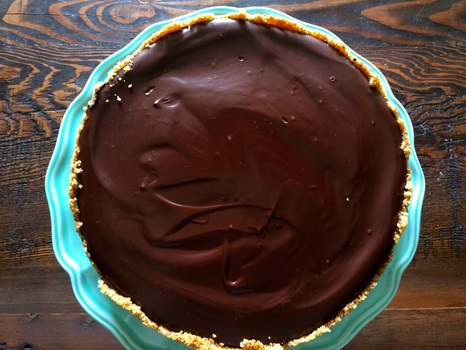 I made this recipe a few years ago and since then I made a couple adjustments to the recipe, including adding a crust. It's one of those desserts that is extremely rich and decadent. If you want your chocolate fix, then this is the recipe for you. Serve small slices because a regular slice is, well, just too much. Serve this at a dinner party or where you will have lots of guests because this is definitely a dessert best shared. I have ¾ of a torte left in the fridge and I'm wondering if we will be able to finish it. Heck, the peach pie I made lasted a good 5 days and it was far less rich. (That recipe will be posted soon, too.) I used a 10-inch springform pan. You can use a 9-inch pan but your cake will be thicker and will need an extra 5-10 minutes to bake. I do not consider this recipe too difficult in terms of technique. There are plenty of pictures to get you through some of the steps should you have issues. Mocha Chocolate Torte with Hazelnut Crust Yield: one 10-inch torte Servings: 12 Crust:
Torte:
Ganache:
Preheat oven to 375ºF. Wrap 2 layers of foil around the outside of a 10-inch spring form pan, bringing the foil up to the rim. Set aside. Spread the hazelnuts on a sheet pan and bake for 10 minutes. Remove from oven and place on a kitchen towel and rub off the brown paper skin (it's ok if not all of it rubs off). Place the hazelnuts in a food processor with the graham crackers, and sugar. Pulse until finely ground. Add the melted butter. Pulse until mixture starts to clump together. Press the mixture into the bottom and 1 inch up the sides of the springform pan. Set aside. Reduce oven temperature to 350ºF. In a small sauce pan, combine the water and sugar. Cook over medium heat until the sugar is dissolved, about 4-5 minutes. Set aside. In a double boiler set over simmering heat, combine the cream, butter, and chocolate. Whisk until melted and smooth. Add the sugar syrup, along with the espresso powder, Kahula, and vanilla. Whisk until smooth. Remove the bowl from over the water. In a small bowl, beat the eggs. Slowly add the eggs to the chocolate mixture, whisking to combine well. Pour batter into the spring form pan. Place the spring form pan in a large roasting pan. Pour enough hot water into the roasting pan to come half-way up the side of the pan. Bake for 35-40 minutes or until the center of the torte no longer giggles in the center. Remove from the water bath, remove the foil, and cool on a rack. Cool completely. Ganache: As the torte is cooling, heat the cream until near boiling (little bubbles will form around the sides). Place the chocolate in a bowl and pour the hot cream over the chocolate. Whisk until smooth. Pour the ganache over the torte. Refrigerate the torte for at least 2 hours before serving. Before serving, run a knife around the edges of the pan and release the sides of the spring form pan. Serve. Torte will keep for up to 3 days in the refrigerator. 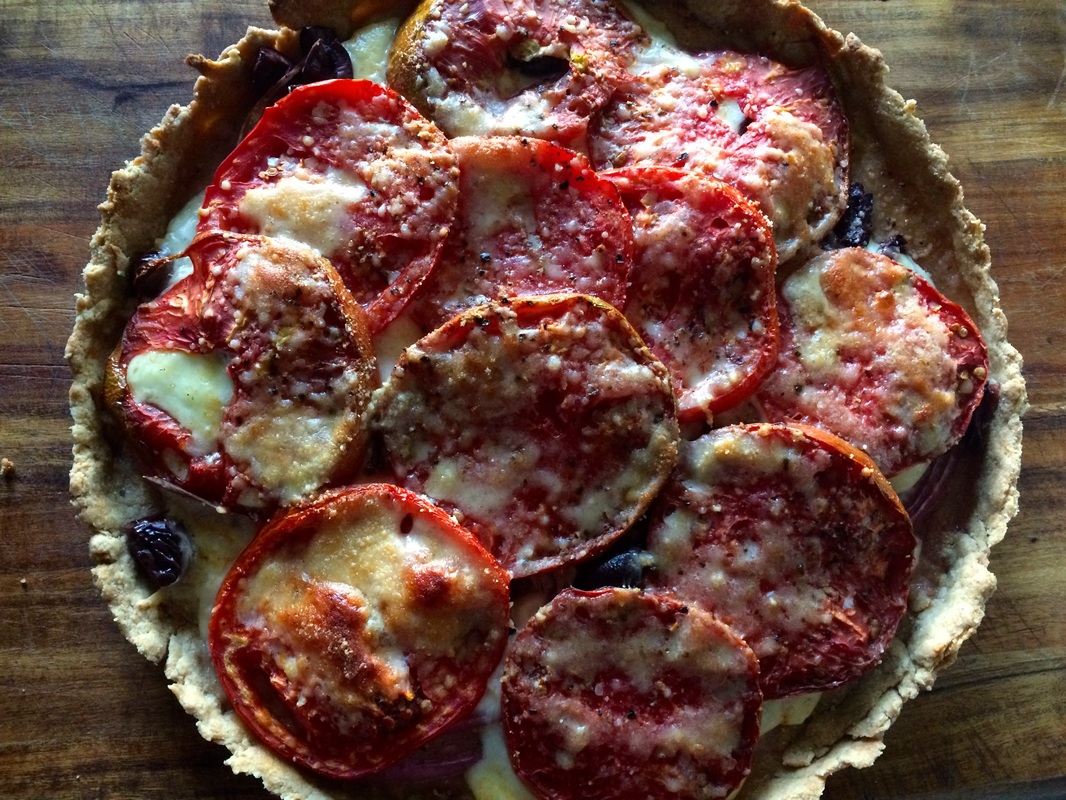 Looking for another way to eat tomatoes since, they’re in season and ready to be served? Of course, you can always opt for the classic BLT. Heck, I like bacon as much as the next person but sometimes you need to give tomatoes a holiday from bacon (or vice versa). This is also a perfect recipe for a brunch or light dinner. It isn’t heavy and if served with a nice salad, it will make a complete meal.
The catch? You have to use fresh, ripe tomatoes. You know those heirloom varieties sold at the farmer’s market? Yeah, those. Buy some and use them for this recipe. It will make a huge difference in the end product. Now, if you look at the title, you’ll see I mention an olive oil crust. Yes, instead of butter, I made the tart pastry with olive oil and yogurt. Why? Well, I like butter. Trust me. Butter is my friend and I’m always happy to use it. But sometimes I like to see if anything else can replace butter. Nothing is a great substitute for butter, let’s be honest. The tart pastry is not flaky; it’s mealy. BUT it tastes great and works really well in this recipe. I do not suggest using this tart pastry for pies. It just won’t taste right and you'll be frustrated. But this is a savory tart and it works. If you remain skeptical, search out Martha Stewart’s Pate Brisee recipe. It’s the standard pie/tart pastry recipe. Tomato Onion Tart with Olive Oil Crust Olive Oil Tart Pastry:
Tart:
Preheat oven to 375ºF. In a bowl, sift together the flour, salt, sugar, and baking powder. In a small bowl, whisk together the wet ingredients (olive oil, water, and yogurt). Stir the wet ingredients into the dry ingredients. Mix until combined. If the mixture is too dry, add a little water. If it’s too wet, add a little flour. It should come together like a regular pastry dough (slightly soft but not sticky or crumbly). Flour the counter and roll the dough into a circle bigger than your tart pan. My tart pan is 11 inches, so I rolled the dough into a 12-inch circle. The tart pastry should be about 1/8-1/4-inch thick. You don’t want it too thick. The pastry might break apart … and that’s perfectly ok. It’s a tart pastry, the most unruly and forgiving of all pastries. Transfer the pastry to the tart pan and tuck the dough into the pan. If it breaks apart, just fill in the holes with the extra dough. Press any of the overhang against the top of the pan. Make sure the sides are enforced well with dough. Slide the tart pan onto a baking sheet. Bake for 6-10 minutes. Basically, you are giving the crust a head start in baking. Remove the tart from the oven and fill it with the tart ingredients. First, layer the onion and olives on the bottom of the pan. Season lightly with salt and pepper. Place the sliced cheese on top of the onions. Drizzle with olive oil. Top with sliced tomatoes. Drizzle with a little more olive oil. Season lightly with salt and pepper and sprinkle the top with parmesan cheese. Return to the oven and bake for 45 minutes. Remove and allow to cool slightly before serving. Can be served warm or at room temperature. How to Peel Tomatoes and Make Fresh Tomato Salsa Salsa Verde (recipe forthcoming) and Fresh tomato salsa Salsa Verde (recipe forthcoming) and Fresh tomato salsa This is the first in a series of posts titled “The Basics” dedicated to teaching basic cooking techniques. It’s tomato season! Real tomatoes are available at a farmer’s market near you, so do not purchase those flavorless, mushy tomatoes at the grocery store. Just don’t do it. The ones sold in the store are picked when they are green and then forced to ripen while in transit to the nearest food distribution center. Ew. Gross. If you want a tomato that actually tastes like a tomato, you have to grow it yourself or buy from a farmer/grower. Or steal the ones from your neighbor’s garden. Don’t worry, I won’t tell. Use only the freshest, ripest tomatoes for this recipe. Any tomato variety will work, although I love using heirloom varieties the most (very meaty and full of flavor). Roma tomatoes can be very juicy, so I like to reserve these for tomato sauce. But any garden variety of tomato (beef steak, etc) will work for salsa. To start off, you need to learn to peel the potatoes. Don’t worry, it’s easy. You can use this same method for peeling peaches (a delicious peach pie recipe is coming to this blog very soon). How to Peel Tomatoes:
How to make Fresh Tomato Salsa:
I like to use a blender for this, but you can chop everything up by hand for a chunkier salsa or use a food processor. The quantities listed in the recipe are estimates and can be adjusted for your own tastes.
In a blender, add the onions, garlic, jalapenos, cilantro, and half of the tomatoes. Blend for about 20 seconds or until the vegetables are finely chopped. Pour into a bowl. Blend the rest of tomatoes if desired or roughly chop them up if you want a chunkier consistency. Stir in the lime juice and season to taste with salt and pepper. Refrigerate for about 1 hour before serving to allow the flavors to develop. 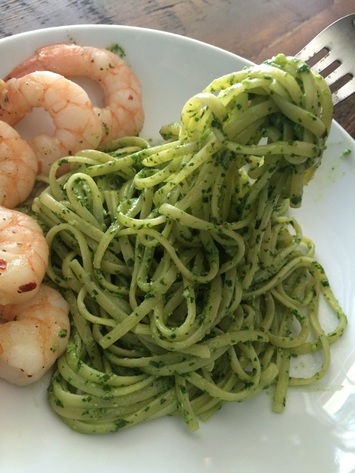 This is a simple pasta to have on a warm summer day. Pesto is one of those delicious sauces that can be made ahead of time and frozen for later consumption. If you have an enormous amount of basil in the garden (mine looked like a huge bush this year), then you might want to make a big batch of pesto and freeze it. However, before freezing it, omit the cheese. Cheese tends to get a little funky when frozen. Add the cheese after it has thawed.
Now, my son is a picky eater but this is one of his favorite pasta dishes. I’m not sure what he likes most about it, but pesto seems to be his thing right now. So, this recipe has been “kid tested, mother approved.” Pesto Pasta Serves 6 Pesto Sauce 3 cups basil leaves 1 cup baby spinach 2 cloves garlic, chopped Juice of 1 lemon ¼ cup parmesan cheese 2-3 tablespoons olive oil Kosher salt and freshly ground black pepper, to taste Optional: 1-2 tablespoons almonds, walnuts, or pine nuts, lightly toasted Pasta ¾ pound linguini pasta, cooked al dente, drained and tossed in 1 tablespoon olive oil 1-2 ounces goat cheese Parmesan cheese If you have not done so already, cook your pasta. As the pasta is cooking, make the pesto. In a food processor, combine the basil, spinach, garlic, lemon juice, and cheese (add the lightly toasted nuts if desired). Pulse until mixture is finely chopped. With the motor running, add the olive oil until it turns into sauce consistency. Season with salt and pepper. Set aside until the pasta is done. When the pasta is done cooking, drain and toss with a little olive oil. Place in a bowl; add the pesto. Toss well until combined. Add the goat cheese and parmesan cheese. Toss until well combined. Serve it by itself or with Spicy Shrimp. Spicy Shrimp: 1 tablespoon olive oil 1 clove garlic, minced 1 pinch red pepper flakes 1 pound uncooked shrimp, peeled and deveined Juice of 1 of lemon Kosher salt and freshly ground black pepper, to taste Heat the olive oil, garlic, and red pepper flakes in a skillet set over medium heat; saute until the garlic starts to sizzle. Add the shrimp and cook until opaque and pink in color, about 2 minutes per side (depends on the size of the shrimp). Add the lemon juice. Season with salt and pepper. Serve. Here we are...
Cooking Rut is now Cooking Sustainably. As you will see in the coming, some of the recipes from Cooking Rut grew legs and sat themselves on this blog. Why the change? Why now? Well, since I'm studying to be a registered dietitian after earning a Masters Degree in Sustainable Food Systems, I thought it would be the perfect time to rebrand Cooking Rut to match my current interests. Cooking Rut started out as a way to catalog my recipes for friends and family. When I started it in 2008, it served as a creative outlet for me especially after we moved from Chicago to Montana in 2009. But now things are different. I completed my masters degree and my dietetic internship. I'm now ready to tackle the next chapter in my life. I've always been looking for a way to incorporate sustainability and nutrition. This is one way to do so. Not all my recipes from Cooking Rut will make their way over here. I'm bringing the best ones and some older recipes will get a face lift, because I'm simply never satisfied with any recipe I create. I'm always thinking of ways to change a recipe to make it better or to suit certain tastes. But this site will also cover issues with sustainability and nutrition on the Nutrition and Sustainability Blog. There's so much information out there about food and nutrition, most of it written by people who think they are experts. I'd like to cut through the chaff and discuss food, nutrition and sustainability in basic, non-judgmental terms. So... stay tuned. I've got exciting things planned! -Marcy 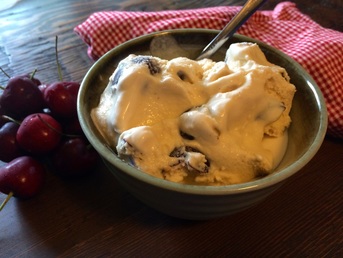 You know you want some. Ice cream, that is. While ice cream is welcome any time of the year, there is something special about eating ice cream in the summer. Maybe it's the heat and humidity. Maybe it's the chance to be outside while eating an ice cream cone as it melts down your hand. Who knows. All I know is that right now we are simmering in the heat of summer and cherries are in season. It is the perfect time of year to make ice cream. Out of all the stone fruits (nectarines, peaches, etc), cherries are by far my favorite. I look forward each season to all the awesome things you can make with cherries -- cherry pie, cherry cobbler, clafoutis, cherry crisp. And cherry ice cream. We live in Cincinnati. If you know about Cincinnati, you know that Graeter's Ice Cream stores are peppered all over town just waiting for you to spend your hard earned cash on creamy, delicious ice cream. They have a few good flavors and they succeed in satisfying the sweet tooth and the cravings you have. In fact, their best flavor in the Black Cherry Chocolate Chip ice cream. It's worth stopping at a Graeters near you to have a taste. But, let's say, you don't have Graeter's near you. Or let's say, you are like me and want to make as much from scratch as possible (crazy, I know... maybe it's a sickness). Or perhaps you have a bunch of sweet cherries laying around begging to be used up. Well, then, I have a recipe for you... As with anything you make from scratch, there is a satisfaction factor. You know, where you stand back and say, "Yep. I made this. And it's awesome." This ice cream has a high satisfaction score. And one more thing ... this recipe should ideally be started the day before you intend to churn your ice cream. This gives the ice cream base time to get cold and develop in flavor. Cherry Chocolate Chunk Ice CreamYield: 1 quart
Special Equipment: Ice Cream Maker Ice Cream Base: 2 cups heavy cream 2 cups half and half 8 egg yolks 3/4 cup sugar 1 teaspoon pure vanilla extract 1/4 teaspoon pure almond extract Cherries: 1 1/4 cups fresh sweet cherries, pitted 1 tablespoon sugar Chocolate: 1/4-1/2 cup semi-sweet chocolate chunks Make the Ice Cream Base: In a 2-quarts saucepan, bring the cream and half and half to an almost boil over medium heat (little bubbles will form along the sides of the pan). Watch it or will boil over. In a bowl, whisk together the egg yolks and sugar until combined. Add about 1/2 of the hot cream mixture to the yolks and whisk until combined. Pour the mixture into the pan with the rest of the cream. While stirring constantly, cook the mixture over medium heat for about 5-7 minutes or until it thickens slightly and reaches 170ºF. Pour into a bowl. Place bowl in an ice bath and stir until the mixture cools to about 50ºF. Stir in the vanilla and almond extracts. Cover and refrigerate mixture until cold, about 4 hours or overnight. Cherries: Combine the pitted cherries and the sugar in a bowl. Refrigerate for at least a 1/2 hour or until ready to use. Churn the ice cream: When you are ready to churn the ice cream, mix together the cherries, chocolate chunks, and ice cream base. Pour into the bowl of the ice cream maker. When churning is complete (according to the machine's directions), scoop the ice cream in to a container and freeze for at least 4 hours before serving. (If you can wait that long... I know it's hard.) Serve. Enjoy. And be sure to share. |
New Book!Shining Star 
 Archives
October 2022
Recipe Categories
All
|

 RSS Feed
Home |
About |
Resources |
About Marcy |
Contact |
Copyright © 2015