
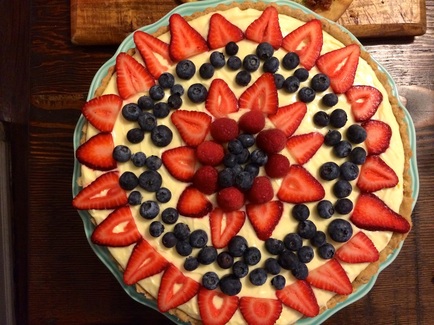
 If you are looking to entertain some of your closest, dearest friends at some point this spring, you may want to try out this dessert. It's sweet, tart, and beautiful to look at. I mean, who wouldn't want to eat it?
Tart crust is more forgiving than pie pastry. Meaning, if it rips or tears while you are rolling it out, you can fill in the holes with extra pastry dough and no one will know. The pastry dough is soft and pliable and it might be a little frustrating to work with, but it works well in the end and holds up nicely (which is what you want). Now, if you don't want to make your own crust, you can always purchase one at the store. Don't worry, I won't rat you out. The recipe is done in steps --first, make the lemon curd, then the tart pastry and then put it all together. The lemon curd and tart pastry can be made up to two days ahead of time (keep in the refrigerator). Also, I used an 11-inch tart pan for this. If you have a smaller tart pan, you will have leftover lemon curd cream (oh no!) to use for something else. I'm sure you'll put it to good use. Or you can just eat it. Whichever. Fresh Berry Lemon Tart Yield: one 11-inch tart Lemon Curd
Remove the zest from the lemons using a vegetable peeler. This will give you nice long strands of zest. Be sure to remove just the yellow part and not the white (the pith). Place the sugar and zest in a food processor. Pulse the processor several times to break up the lemon zest. Add the butter to the sugar mixture. Process until combined. Add the lemon juice, eggs, egg yolks, and salt. Process to combine. Pour the mixture into a 2-quart saucepan set over medium low heat. Cook, stirring constantly, until thickened (the mixture should register 170ºF on a thermometer when it is cooked), about 10 minutes. Remove from the heat and pour into a glass bowl. Allow it to cool for 20 minutes on the counter and then cover with plastic wrap and refrigerate for at least 2 hours. This can be made up to 2 days ahead of time. It will continue to set as it cools. Tart Pastry
You can make this by hand with a pastry blender or with a food processor. By processor: Combine the flour, almond meal, sugar, and salt in the bowl of a processor. Add the butter and pulse until the mixture resembles coarse meal. With the motor running, pour the water through the lid and pulse until the pastry forms a ball in the bowl of the processor. The pastry maybe a little on the wet or soft side. That's ok. Brush your hands with flour and gather the pasty in a ball. Press into a disk and wrap in plastic wrap. Place in the refrigerator for at least 1 hour. This can be made up to 2 days ahead of time. Fresh Berry Tart
Preheat the oven to 350ºF. Place the tart pan in a baking sheet (this will help keep it steady as you move it to/from the oven). Roll out the tart pastry on a well-floured surface. Sprinkle the top of the pastry with flour, too. It should be rolled out to about a 12-inch circle. If the pastry is tearing and being unmanageable, that's ok. Gather up the pastry and press it into the bottom and sides of the tart pan (cutting off any excess), filling in any gaps or holes with leftover pastry dough. Once the pastry is covering the inside of the tart pan, prick the bottom with a fork. Line the pastry with foil - make sure it meets the edge of pastry and fill the foil with pie weights, dried beans, or dry rice (I use beans). Be sure you fill the foil to the edges of the pan. This will help prevent the pastry from shrinking down. Bake for 10-12 minutes. Remove the foil and beans (or pie weights). Bake for an additional 12-13 minutes or until golden brown. Remove from the oven and cool completely. In a bowl, whip together the heavy cream and mascarpone cheese until the mixture forms soft peaks. Add the powdered sugar. Place the lemon curd in a large bowl. Stir it up to loosen the curd. Add about a 1/4 of the cream mixture to the lemon curd and mix well. Fold in the remaining cream mixture, being sure not to over mix. Pour the mixture into the tart shell and smooth off the top. Refrigerate the tart for at least 1 hour before decorating the top with berries. When ready, decorate the top with berries and cut into pieces to serve.
0 Comments
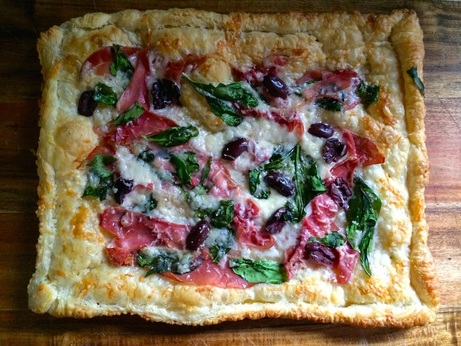 Puff pastry is for more than just tasty little tarts. You can use it for savory dishes as well. Instead of making pizza crust, try using puff pastry. It will turn out flakier (much more so) than traditional pizza dough but it adds a little buttery goodness along with a light airy crunch. This recipe would also make a great appetizer. It's easy to throw together and bake and would be good for tailgating or even if you want to impress your mother-in-law. Whichever. Before you begin, be sure to thaw the puff pastry according to package directions. Puff Pastry Tart with Prosciutto and Spinach Serves 4-6
Preheat the oven to 400ºF. Line a baking sheet with parchment paper. Set aside. On a lightly floured surface, roll the puff pastry into a 12x8-inch rectangle. Transfer the pastry to the baking sheet. Fold in each side of the pastry by a 1/2-inch to create a border. Make several marks with a fork in the center of the puff pastry (see photo below). This helps prevent the center from puffing up too much while it bakes. Decoratively (like you are making a pizza), place the slices of the prosciutto, spinach, and olives in the center of the pastry. Sprinkle the top with both of the cheeses. Bake in the hot oven for 15 minutes or until golden brown. Remove and cut into squares. Serve warm. 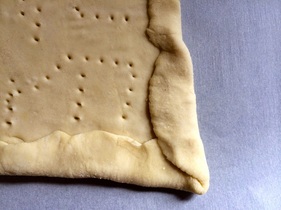 Folding in the sides to make an edge. 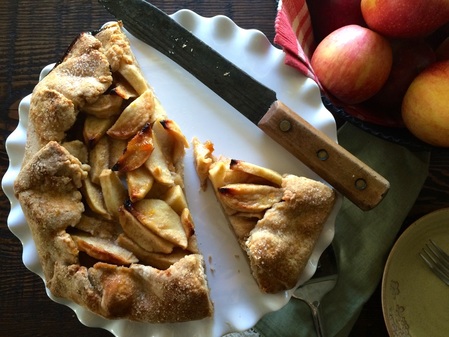 A galette is the French term for rustic pie or freeform pastry. These can be made with any fruit filling. For instance, I once catered a party and made 7 mixed berry galettes. I wanted to serve a lovely dessert but I don't own 7 pie plates and making galettes was relatively simple and easy to assemble. Since it's apple season and there are a plethora of apples being sold at farmers markets or at your local apple orchard, I figured an Apple Galette was in store for us. When making any apple dessert, I always use 2-3 different varieties of apples. Why? For flavor and texture. Some apples are tart, while others are sweet and juicy. I like a combination. My favorite varieties to bake with are Gala, Fuji, Macintosh, Braeburn, and Honey Crisp. There are several other varieties to choose from, however. Jonathan makes the best applesauce, but I rarely ever use it in pie. Red Delicious are only good for eating and even then they have a tendency to taste rather bland. At any rate, go for a mix of apples. Your pie or galette will be even better. Apple Galette Yield: 1 9-10 inch galette Pie Pastry
In the bowl of a food processor, combine the white whole wheat flour, all-purpose flour, sugar, and salt. Add the butter and pulse for 15-30 seconds to create a coarse looking mixture. With the food processor running, add the water until the mixture forms into a ball. Mound the pastry dough into a ball and flatten slightly. Cover with plastic wrap and refrigerate for at least 1 hour before using. Can be made up to 2 days ahead of time. Galette
Preheat oven to 400ºF. Line a baking sheet with parchment paper. Set aside. In a medium sized bowl combine the apples, honey, orange zest, and orange juice. In a small bowl, mix together the 1/2 cup sugar, cinnamon, and cornstarch. Add to the apple mixture and stir to combine. Set aside. On a lightly floured surface, roll pie pastry to a 12-inch diameter circle. Transfer pie crust to a baking sheet. Place the apple mixture in the center of the pie crust, leaving a 2-inch border around the edge of the crust. Dot the filling with the butter. Fold in the sides of the crust, overlapping as you go around the circle. Brush the crust with the cream and sprinkle with sugar. Bake for 25-30 minutes or until crust is golden brown and apples are soft. Serve with ice cream or sweetened whipped cream. Cheddar and Chive Biscuits Making biscuits is similar to making pie crust -- you need cold butter to achieve flaky biscuits (just like with pie crust). Of course, the flakiest pie crusts and biscuits are made with shortening or lard but the best tasting ones are made with butter. If you want, you can substitute half of butter for lard (as a rule, I do not use shortening) for either biscuits or pie crust. These biscuits are made with white whole wheat flour, making them a little more dense. You can use all white flour, that's fine. You may need to decrease the amount of butter milk to 3/4 cup since whole wheat flour absorbs more moisture than white flour. Even though I added cheddar and chives to the recipe, you can either omit these items or add your own herb and cheese combination. Goat cheese and rosemary sounds like a good combination if you ask me and serve with roasted lamb chops. Seriously, that sounds really damn good. But I digress... It's time to step into the kitchen and make biscuits for a Sunday morning treat. Your family will love you even more. Cheddar and Chive Biscuits Yield: about 1 dozen
Preheat oven to 425ºF. In a bowl, mix together the flours, baking powder, baking soda, sugar, and salt. Add the cubed butter and with a pastry blender, cut the butter into the flour mixture until it resembles coarse meal. Stir in the buttermilk. Mix until dough starts to form. Add the cheese and chives; mix to combine. Form the dough into a ball and place on a lightly floured surface. Roll to about a 1/2 inch thick. Using a biscuit cutter, cut into shapes and place on a baking sheet. Reroll the dough until you use it all up. The last biscuit will look a little wonky but that's ok. They all don't have to be perfect. Bake for 10-15 minutes or until golden brown. Cool slightly on a wire rack. Biscuits are best served slightly warm with a pad of butter. Peach Pie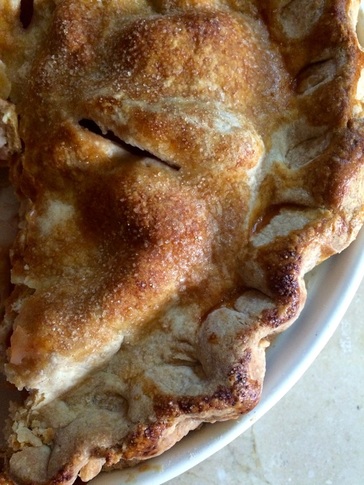 I’ll take pie over cake any day of the week. A good pie has a flaky crust for a foundation and a sweet filling, but not too sweet. Now, my favorite pies are ones that are made simply – utilizing the freshness and ripeness of the fruit. Apple and cherry pies are by far my favorite, but I won’t turn down peach pie made with fresh, ripe peaches. I bought peaches at a local farmer’s market. They were fresh and ripe, ready for pie. Instead of using cinnamon, I decided to use cardamom. It offers a spicy, yet warm flavor to the pie. If you prefer, you can substitute cinnamon or leave it out completely. It’s up to you, but I encourage you to try cardamom. If you have never made a pie crust before, now’s the time to learn! The recipe is a basic all-butter pie pastry. It’s a classic recipe that can be used for any pie or tart. Pie Pastry makes a double pastry
In the bowl of a food processor, combine the flour, salt, and sugar. Add the butter and pulse until the mixture resembles coarse meal. With the motor running, drizzle the water through the feed tube. Add enough water until the mixture starts to clump together. If the mixture seems too dry, add a little water. If you added too much water, add some flour. The mixture should be somewhat dry and hold together. It should not be crumbly or sticky. Divide the dough into 2 discs. Wrap each in plastic and refrigerate for at least 1 hour. Can be made 1-2 days ahead or 1 month ahead if kept in the freezer. and now for the main event: Peach Pie Yield: 1 10-inch pie Serves 8-10
Preheat the oven to 400ºF. Peel the peaches by the same blanching method as the tomatoes. Bring a pot of water up ta simmer (near boiling). Mark an “X” in the bottom of each peach and the place the peaches in the hot, simmering water for 30-60 seconds. Remove each peach and place in ice water. The skins should peel off easily, especially if they’re ripe. Cut the pit of each peach and slice into pieces. In a bowl, combine the sugar and cornstarch. Add the sliced peaches, lemon juice, ginger, cardamom, and salt. Mix well and set aside. On a floured surface, roll out one pie crust to a 12-inch diameter. Tuck the dough into the pie plate. Be careful not to stretch it; tuck it in. Stretching the pastry causes it to shrink. Pour the filling into the pie shell. Dot the filling with the butter. Roll out the second pie crust and and place over the filling. Cut off any excess pie pastry leaving about an inch lip around the pie. Fold the edges under and crimp decoratively around the edge. Mark the top of the pie crust with 4 slits. Brush the crust with the heavy cream and sprinkle with sugar. Place the pie on a baking sheet (in case it boils over). Bake for 10 minutes and then lower the temperature to 375ºF. Bake for 1 hour to 1 hour 15 minutes. Tent the pie if the edges get too brown. Cool to room temperature on a wire rack. Chill for 3-4 hours before serving. Serve a la mode. 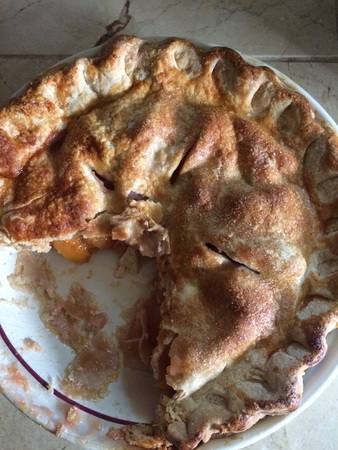 A good pie doesn't last long around the house. 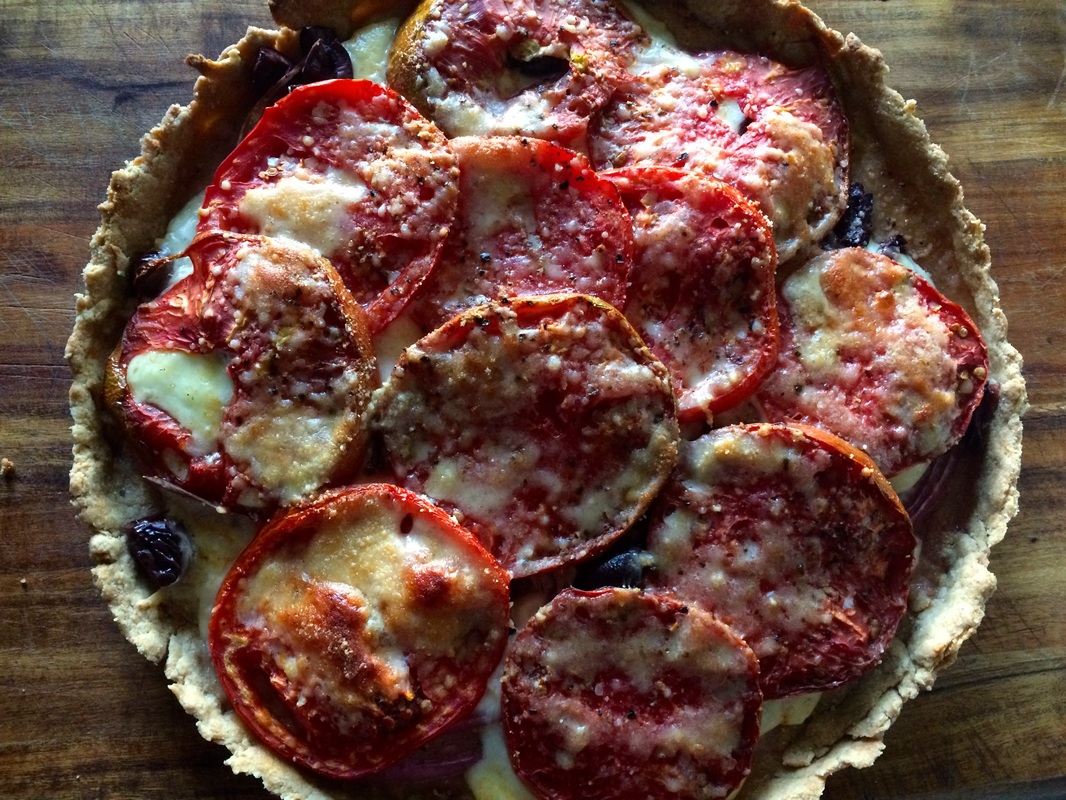 Looking for another way to eat tomatoes since, they’re in season and ready to be served? Of course, you can always opt for the classic BLT. Heck, I like bacon as much as the next person but sometimes you need to give tomatoes a holiday from bacon (or vice versa). This is also a perfect recipe for a brunch or light dinner. It isn’t heavy and if served with a nice salad, it will make a complete meal.
The catch? You have to use fresh, ripe tomatoes. You know those heirloom varieties sold at the farmer’s market? Yeah, those. Buy some and use them for this recipe. It will make a huge difference in the end product. Now, if you look at the title, you’ll see I mention an olive oil crust. Yes, instead of butter, I made the tart pastry with olive oil and yogurt. Why? Well, I like butter. Trust me. Butter is my friend and I’m always happy to use it. But sometimes I like to see if anything else can replace butter. Nothing is a great substitute for butter, let’s be honest. The tart pastry is not flaky; it’s mealy. BUT it tastes great and works really well in this recipe. I do not suggest using this tart pastry for pies. It just won’t taste right and you'll be frustrated. But this is a savory tart and it works. If you remain skeptical, search out Martha Stewart’s Pate Brisee recipe. It’s the standard pie/tart pastry recipe. Tomato Onion Tart with Olive Oil Crust Olive Oil Tart Pastry:
Tart:
Preheat oven to 375ºF. In a bowl, sift together the flour, salt, sugar, and baking powder. In a small bowl, whisk together the wet ingredients (olive oil, water, and yogurt). Stir the wet ingredients into the dry ingredients. Mix until combined. If the mixture is too dry, add a little water. If it’s too wet, add a little flour. It should come together like a regular pastry dough (slightly soft but not sticky or crumbly). Flour the counter and roll the dough into a circle bigger than your tart pan. My tart pan is 11 inches, so I rolled the dough into a 12-inch circle. The tart pastry should be about 1/8-1/4-inch thick. You don’t want it too thick. The pastry might break apart … and that’s perfectly ok. It’s a tart pastry, the most unruly and forgiving of all pastries. Transfer the pastry to the tart pan and tuck the dough into the pan. If it breaks apart, just fill in the holes with the extra dough. Press any of the overhang against the top of the pan. Make sure the sides are enforced well with dough. Slide the tart pan onto a baking sheet. Bake for 6-10 minutes. Basically, you are giving the crust a head start in baking. Remove the tart from the oven and fill it with the tart ingredients. First, layer the onion and olives on the bottom of the pan. Season lightly with salt and pepper. Place the sliced cheese on top of the onions. Drizzle with olive oil. Top with sliced tomatoes. Drizzle with a little more olive oil. Season lightly with salt and pepper and sprinkle the top with parmesan cheese. Return to the oven and bake for 45 minutes. Remove and allow to cool slightly before serving. Can be served warm or at room temperature. |
New Book!Shining Star 
 Archives
October 2022
Recipe Categories
All
|
 RSS Feed
Home |
About |
Resources |
About Marcy |
Contact |
Copyright © 2015